[React 19] 공식문서 톺아보기 - State 관리하기
목차
1. State를 사용해 Input 다루기
-
React에서는 직접 UI를 조작할 필요가 없다.
-
React에서는 무엇을 보여주고 싶은지에 대해 생각하는 선언적 ui에 대해서 고민해야 한다.
-
다음은 UI를 선언적인 방식으로 구성하는 단계에 대해서 설명한다.
1) 컴포넌트의 다양한 시각적 state 확인하기
먼저 사용자가 볼 수 있는 UI의 모든 “state”를 시각화한다. 상태를 정의하고 각 상태별로 어떤것이 보여야하는지 정리한다.
- Empty: 폼은 비활성화된 “제출” 버튼을 가지고 있다.
- Typing: 폼은 활성화된 “제출” 버튼을 가지고 있다.
- Submitting: 폼은 완전히 비활성화되고 스피너가 보인다.
- Success: 폼 대신에 “감사합니다” 메시지가 보인다.
- Error: “Typing” state와 동일하지만 오류 메시지가 보인다.
export default function Form({ status = 'success' }) {
  if (status === 'success') {
    return <h1>That's right!</h1>;
  }

  return (
    <>
      <h2>City quiz</h2>
      <p>
        In which city is there a billboard that turns air into drinkable water?
      </p>
      <form>
        <textarea disabled={status === 'submitting'} />
        <br />
        <button disabled={status === 'empty' || status === 'submitting'}>
          Submit
        </button>
        {status === 'error' && (
          <p className='Error'>Good guess but a wrong answer. Try again!</p>
        )}
      </form>
    </>
  );
}
export default function Form({ status = 'success' }) {
if (status === 'success') {
return <h1>That's right!</h1>;
}
return (
<>
<h2>City quiz</h2>
<p>
In which city is there a billboard that turns air into drinkable water?
</p>
<form>
<textarea disabled={status === 'submitting'} />
<br />
<button disabled={status === 'empty' || status === 'submitting'}>
Submit
</button>
{status === 'error' && (
<p className='Error'>Good guess but a wrong answer. Try again!</p>
)}
</form>
</>
);
}- 각각의 모든 요소를 컨트롤하는게 아니라 상태에 따른 ui를 미리 선언해두고 상태를 변경하여 알맞는 ui를 보여준다.
2) 무엇이 state 변화를 트리거하는지 알아내기
두 종류의 인풋 유형으로 state 변경을 트리거할 수 있다.
- 휴먼 인풋 : 버튼을 누르거나, 필드를 입력하거나, 링크를 이동한다.
- 컴퓨터 인풋 : 네트워크 응답이 오거나, 타임아웃이 되거나, 이미지를 로딩한다.
ui 변경요소 찾기
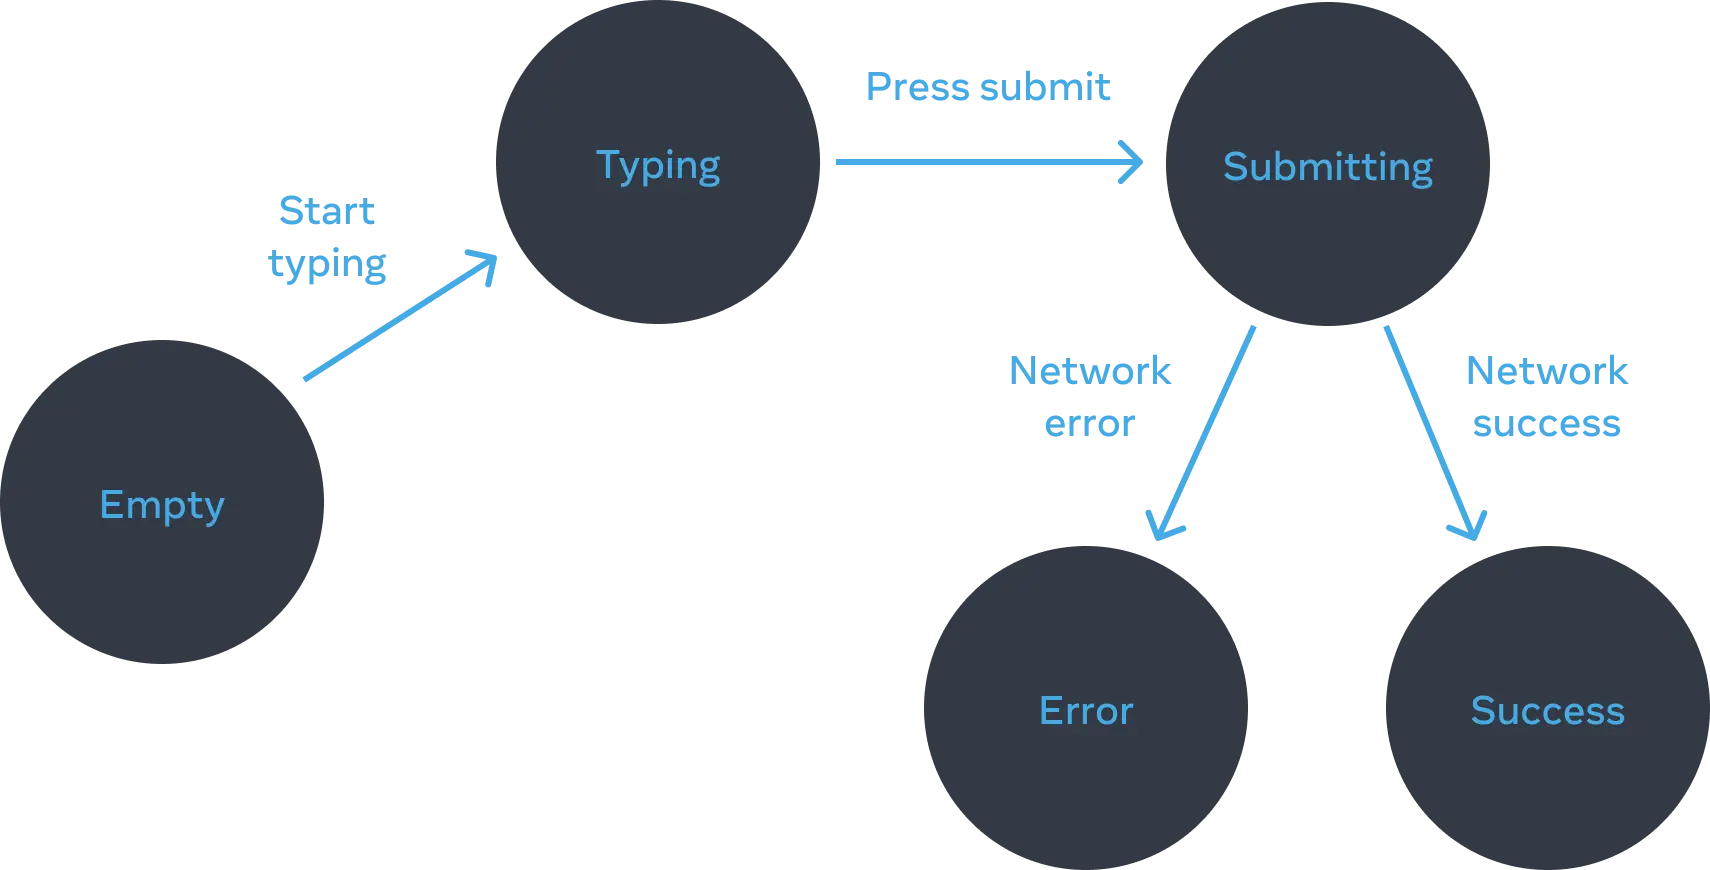
- 텍스트 인풋을 변경하면 (휴먼) 텍스트 상자가 비어있는지 여부에 따라 state를 Empty에서 Typing 으로 또는 그 반대로 변경해야 한다.
- 제출 버튼을 클릭하면 (휴먼) Submitting state를 변경해야 한다.
- 네트워크 응답이 성공적으로 오면 (컴퓨터) Success state를 변경해야 한다.
- 네트워크 요청이 실패하면 (컴퓨터) 해당하는 오류 메시지와 함께 Error state를 변경해야 한다.
상태를 정의하는 방법이나 상호작용을 다루는 부분에 학부생때 배운 '오토마타와 형식언어'와 매우 비슷했다.
3) 메모리의 state를 useState로 표현하기
이제 위에 정리를 토대로 꼭 필요한 state 먼저 선언해보자.
const [answer, setAnswer] = useState('');
const [error, setError] = useState(null);
const [answer, setAnswer] = useState('');
const [error, setError] = useState(null);시각적인것에 영향을 주는 state 추가한다. 너무 많아졌다.
const [isEmpty, setIsEmpty] = useState(true);
const [isTyping, setIsTyping] = useState(false);
const [isSubmitting, setIsSubmitting] = useState(false);
const [isSuccess, setIsSuccess] = useState(false);
const [isError, setIsError] = useState(false);const [isEmpty, setIsEmpty] = useState(true);
const [isTyping, setIsTyping] = useState(false);
const [isSubmitting, setIsSubmitting] = useState(false);
const [isSuccess, setIsSuccess] = useState(false);
const [isError, setIsError] = useState(false);4) 불필요한 state 변수를 제거하기
- 너무 많은 상태를 이제 줄여나가야 한다.
- 공식문서에서는 다음 3개의 기준에 따라 줄여나간다.
-
역설을 일으키는가? :
isTyping과isSubmitting이 동시에true일 수는 없습니다. -
다른 state에 이미 같은 정보가 포함되어 있는가? :
isEmpty와isTyping은 동시에true가 될 수 없습니다.isEmpty를 지우고answer.length === 0으로 체크할 수 있습니다. -
다른 변수를 통해 알아낼수는 없는가? :
isError는error !== null로도 대신 확인할 수 있다.
const [answer, setAnswer] = useState('');
const [error, setError] = useState(null);
const [status, setStatus] = useState('typing'); // 'typing', 'submitting', or 'success'const [answer, setAnswer] = useState('');
const [error, setError] = useState(null);
const [status, setStatus] = useState('typing'); // 'typing', 'submitting', or 'success'그렇게 줄인 결과는 위와 같다.
사실 개발하면서 줄일수 있더라도, 코드를 보는건 사람이기에 좀더 가독성이 좋다는 이유하에 여러 상태를 중복해서 선언했던것 같다.
특히 위와 같이 여러 상태를 status이라는 하나의 state로 퉁치는 것은 이 state만 보고는 어떤 값까지 가능한지 유추하기 어렵다고 생각했다. 그리고 사람이기에 불리언 타입보다 문자열은 실수하기 쉽다고도 생각했다.
한창 '가독성 좋은 코드'란 무엇일까에 대해서 고민하던 시절의 생각이다. 물론 타입스크립트의 도움을 받으면 해결된다.
5) state 설정을 위해 이벤트 핸들러를 연결하기
이벤트 핸들러에 연결한다.
2. State 구조 선택하기
위와 비슷하게 state를 더 줄일수 있는 방법에 대해 설명하고 있다.
연관된 state 그룹화하기
const [x, setX] = useState(0);
const [y, setY] = useState(0);
const [x, setX] = useState(0);
const [y, setY] = useState(0);const [position, setPosition] = useState({ x: 0, y: 0 });const [position, setPosition] = useState({ x: 0, y: 0 });두 개 이상의 state 변수를 항상 동시에 업데이트한다면, 단일 state 변수로 병합하는 것을 고려할 수 있다.
State의 모순 피하기
예를들어 isLoaded와 isLoading은 동시에 true가 될수 없다. 이러한 모순적인 상황이 발생할 수 있는 여지를 남기지 말고 하나의 state로 관리하는 것이다.
const [isLoaded, setIsLoaded] = useState(false);
const [isLoading, setIsLoading] = useState(true);
const [isLoaded, setIsLoaded] = useState(false);
const [isLoading, setIsLoading] = useState(true);// 두 개를 모두 state로 선언하는대신 하나만 선언하고 하나는 변수로 선언한다.
const [isLoading, setIsLoading] = useState(true);
const isLoaded = !isLoading;// 두 개를 모두 state로 선언하는대신 하나만 선언하고 하나는 변수로 선언한다.
const [isLoading, setIsLoading] = useState(true);
const isLoaded = !isLoading;불필요한 state 피하기
기존 state를 통해서 계산이 가능하다면 굳이 state로 선언하지 말아야한다.
const [firstName, setFirstName] = useState('');
const [lastName, setLastName] = useState('');
const [fullName, setFullName] = useState('');
const [firstName, setFirstName] = useState('');
const [lastName, setLastName] = useState('');
const [fullName, setFullName] = useState('');const [firstName, setFirstName] = useState('');
const [lastName, setLastName] = useState('');
const fullName = firstName + ' ' + lastName;const [firstName, setFirstName] = useState('');
const [lastName, setLastName] = useState('');
const fullName = firstName + ' ' + lastName;fullName은 firstName와 lastName를 통해서 계산되므로 따로 state로 선언하지 않아도 된다.
State의 중복 피하기
리스트에서 선택한 아이템을 저장해야할 경우 각각 저장하는 것보다 선택한 아이템의 id값을 저장하여 중복 데이터를 피할 수 있다.
const [items, setItems] = useState(initialItems);
const [selectedItem, setSelectedItem] = useState(items[0]);
const [items, setItems] = useState(initialItems);
const [selectedItem, setSelectedItem] = useState(items[0]);const [items, setItems] = useState(initialItems);
const [selectedId, setSelectedId] = useState(0);const [items, setItems] = useState(initialItems);
const [selectedId, setSelectedId] = useState(0);깊게 중첩된 state 피하기
깊게 계층화된 state는 업데이트하기 쉽지 않다. 가능하면 state를 평탄한 방식으로 구성해보자.
export const initialTravelPlan = {
  id: 0,
  title: '(Root)',
  childPlaces: [{
    id: 1,
    title: 'Earth',
    childPlaces: [{
      id: 2,
      title: 'Africa',
      childPlaces: [{
        id: 3,
        title: 'Botswana',
        childPlaces: []
export const initialTravelPlan = {
id: 0,
title: '(Root)',
childPlaces: [{
id: 1,
title: 'Earth',
childPlaces: [{
id: 2,
title: 'Africa',
childPlaces: [{
id: 3,
title: 'Botswana',
childPlaces: []export const initialTravelPlan = {
0: {
id: 0,
title: '(Root)',
childIds: [1, 42, 46],
},
1: {
id: 1,
title: 'Earth',
childIds: [2, 10, 19, 26, 34]
},
2: {
id: 2,
title: 'Africa',
childIds: [3, 4, 5, 6 , 7, 8, 9]
},export const initialTravelPlan = {
0: {
id: 0,
title: '(Root)',
childIds: [1, 42, 46],
},
1: {
id: 1,
title: 'Earth',
childIds: [2, 10, 19, 26, 34]
},
2: {
id: 2,
title: 'Africa',
childIds: [3, 4, 5, 6 , 7, 8, 9]
},Props를 state에 미러링하지 않기
function Message({ messageColor }) {
  const [color, setColor] = useState(messageColor);
function Message({ messageColor }) {
const [color, setColor] = useState(messageColor);- 위와 같이 선언한 코드는 부모컴포넌트에서 messageColor값이 바뀌었을때 동기화되지 않는다.
function Message({ messageColor }) {
  const color = messageColor;
function Message({ messageColor }) {
const color = messageColor;- 만약 동기화를 시키려고 할때는 위와 같이 변수로 선언하거나, 아니면 props를 직접 사용하거나 useEffect(비추)로 업데이트를 하거나 key값을 이용해 state를 초기화 시키는 방법이 있다.
function Message({ initialColor }) {
    const [color, setColor] = useState(initialColor);
function Message({ initialColor }) {
const [color, setColor] = useState(initialColor);- 단지 초기값으로 사용할때는 명시적으로 initial-, default-를 붙여 의미를 나타낸다.
3. 컴포넌트 간 State 공유하기
State 끌어올리기
두 컴포넌트의 state가 같이 변경되어야하는 상황이 생길 수 있다. 이때는 각 컴포넌트에서 state를 제거하고 가장 가까운 공통 부모 컴포넌트에 선언한 후 props로 전달한다. 이 방법을 'State 끌어올리기'라고 한다.
const [activeIndex, setActiveIndex] = useState(0);

<>
  <Panel isActive={activeIndex === 0} onShow={() => setActiveIndex(0)}>
    ...
  </Panel>
  <Panel isActive={activeIndex === 1} onShow={() => setActiveIndex(1)}>
    ...
  </Panel>
</>;
const [activeIndex, setActiveIndex] = useState(0);
<>
<Panel isActive={activeIndex === 0} onShow={() => setActiveIndex(0)}>
...
</Panel>
<Panel isActive={activeIndex === 1} onShow={() => setActiveIndex(1)}>
...
</Panel>
</>;controlled and uncontrolled components
// 부모 컴포넌트
function Parent() {
  const [value, setValue] = useState('초기값');
  return <Child value={value} onChange={(e) => setValue(e.target.value)} />;
}

// 자식 컴포넌트 (순수 제어형)
function Child({ value, onChange }) {
  return <input value={value} onChange={onChange} />;
}
// 부모 컴포넌트
function Parent() {
const [value, setValue] = useState('초기값');
return <Child value={value} onChange={(e) => setValue(e.target.value)} />;
}
// 자식 컴포넌트 (순수 제어형)
function Child({ value, onChange }) {
return <input value={value} onChange={onChange} />;
}- 제어형 컴포넌트로 부모에서 state가 선언되었고 값을 변경할 수 있다.
  const inputRef = useRef(null); // ref로 DOM 접근

  const handleSubmit = (e) => {
    e.preventDefault();
    alert("입력된 값: " + inputRef.current.value); // 수동으로 값 읽기
  };

  return (
    <form onSubmit={handleSubmit}>
      <input
        type="text"
        ref={inputRef}
        defaultValue="초기값" // 초기값만 설정
      />
      <button type="submit">제출</button>
    </form>
  );
}
const inputRef = useRef(null); // ref로 DOM 접근
const handleSubmit = (e) => {
e.preventDefault();
alert("입력된 값: " + inputRef.current.value); // 수동으로 값 읽기
};
return (
<form onSubmit={handleSubmit}>
<input
type="text"
ref={inputRef}
defaultValue="초기값" // 초기값만 설정
/>
<button type="submit">제출</button>
</form>
);
}- 비제어형 컴포넌트의 예시로 입력폼을 들수 있는데 초기값만 주어지고 부모컴포넌트에서는 해당값을 변경할 수 없다.
4. State를 보존하고 초기화하기
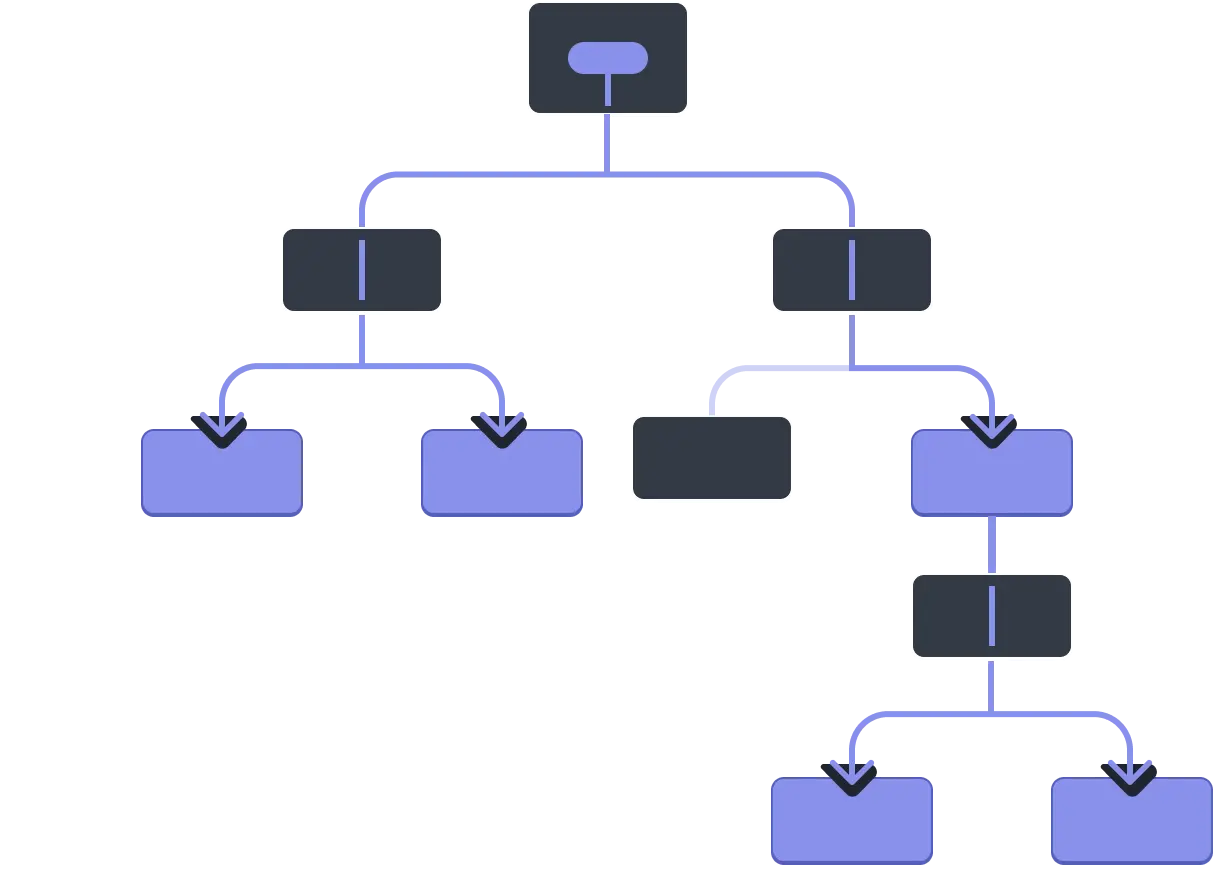
State 는 렌더트리의 위치에 연결됩니다
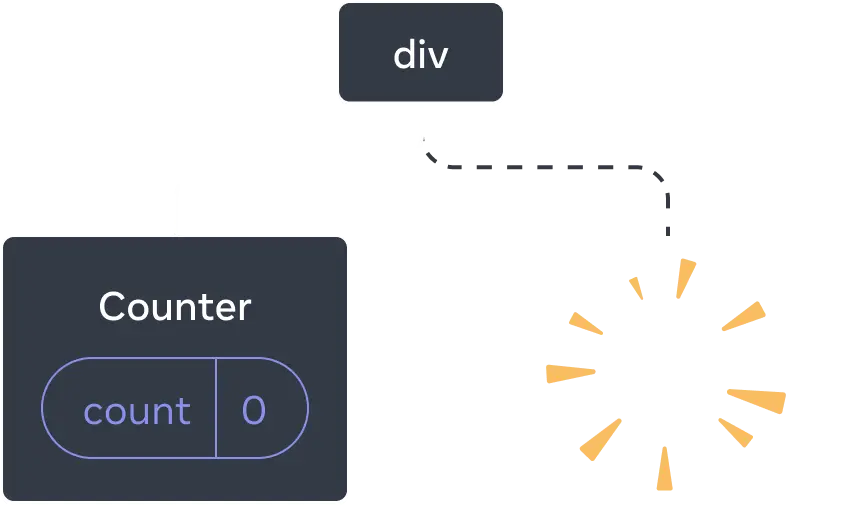
React는 트리의 동일한 컴포넌트를 동일한 위치에 렌더링하는 동안 상태를 유지한다.
컴포넌트를 제거하게 되면 React가 그 state도 같이 제거된다.
같은 자리의 같은 컴포넌트는 state를 보존합니다
<>{isFancy ? <Counter isFancy={true} /> : <Counter isFancy={false} />}</><>{isFancy ? <Counter isFancy={true} /> : <Counter isFancy={false} />}</>위와 같은 컴포넌트가 있을때 isFancy의 값에 따라서 과연 Counter 컴포넌트 내부에 state는 초기화가 될까?
위 설명의 연장선에서 생각해보자. isFancy 값이 변하더라도 컴포넌트의 위치를 변동시키지는 않는다.
다시 말해 모든게 동일하고 props만 변경되는 것이므로 내부 state는 초기화 되지 않는다.
삼항연산자를 통해 완전히 '교체'되는 것처럼 보이지만 결과적으로 JSX 마크업에서가 아닌 UI 트리에서의 위치는 변하지 않는다는 점에 주목해야한다.
if (isFancy) {
  return <Counter isFancy={true} />
}

return <Counter isFancy={false} />
if (isFancy) {
return <Counter isFancy={true} />
}
return <Counter isFancy={false} />- 따라서 삼항연산자든 위와같이 if문을 사용하든 컴포넌트 위치가 동일하면 state는 보존된다.
if (isFancy) {
  return (
    <div>
      <Counter isFancy={true} />
    </div>
  );
}

return <Counter isFancy={false} />;
if (isFancy) {
  return (
    <div>
      <Counter isFancy={true} />
    </div>
  );
}

return <Counter isFancy={false} />;
- 위와 같은 경우는 위치가 변했으므로 내부 state는 초기화 된다.
if (isFancy) {
  return (
    <div>
      <Counter isFancy={true} />
    </div>
  );
}

return (
  <section>
    <Counter isFancy={false} />
  </section>
);
if (isFancy) {
return (
<div>
<Counter isFancy={true} />
</div>
);
}
return (
<section>
<Counter isFancy={false} />
</section>
);
- Counter의 위치는 같은거 같지만 첫번째 자식이 달라졌으므로 그 하위 서브트리의 state를 초기화 시킨다.
- 부모 요소의 타입이 변경되면, 그 자식들은 모두 새로 마운트됩니다.
같은 위치에서 state 초기화 하기
<>{isFancy ? <Counter isFancy={true} /> : <Counter isFancy={false} />}</><>{isFancy ? <Counter isFancy={true} /> : <Counter isFancy={false} />}</>이 코드는 스타일의 변화만 있기에 state를 유지하는게 의도였지만
<>{isPlayerA ? <Counter person='Taylor' /> : <Counter person='Sarah' />}</><>{isPlayerA ? <Counter person='Taylor' /> : <Counter person='Sarah' />}</>위 코드의 경우는 state가 초기화 되어야한다.
하지만 두 컴포넌트의 위치가 동일해서 state가 초기화 되지 않는다.
가상dom과 비교하는 과정에서 React는 그들을 person props가 변경된 같은 Counter로 본다.
해결방안1 - 다른 위치에 컴포넌트 렌더링하기

<>
  {isPlayerA && <Counter person='Taylor' />}
  {!isPlayerA && <Counter person='Sarah' />}
</>
<>
{isPlayerA && <Counter person='Taylor' />}
{!isPlayerA && <Counter person='Sarah' />}
</>각 Counter의 state는 DOM에서 지워질 때마다 제거된다.
해결방안2 - key를 이용해 state 초기화하기
key는 배열을 위한 것만은 아니다. React가 다른 컴포넌트로 인식하도록 key를 사용할 수도 있다.
<>
  {isPlayerA ? (
    <Counter key='Taylor' person='Taylor' />
  ) : (
    <Counter key='Sarah' person='Sarah' />
  )}
</>
<>
{isPlayerA ? (
<Counter key='Taylor' person='Taylor' />
) : (
<Counter key='Sarah' person='Sarah' />
)}
</>key를 명시하면 React는 부모 내에서의 순서 대신에 key 자체를 위치의 일부로 사용한다.
컴포넌트를 JSX에서 같은 자리에 렌더링하지만 React 관점에서는 다른 컴포넌트로 인식한다.
key의 값은 전역적으로 유일하지 않아도 된다. key는 오직 부모 안에서만 자리를 명시한다.
5. state 로직을 reducer로 작성하기
컴포넌트가 커질수록 그 안에서 state를 다루는 로직의 양도 늘어난다.
복잡성은 줄이고 접근성을 높이기 위해서, 컴포넌트 내부에 있는 state 로직을 컴포넌트 외부의 “reducer”라고 하는 단일 함수로 옮길 수 있다.
useReducer에 대해서는 뒤에 자세히 나오니 간단하게 바꾸는 방법에 대해서만 알아보자
useReducer로 바꾸기 1 - dispatch 함수를 통해 state를 변경한다
dispatch(
  // "action" 객체:
  {
    type: 'deleted',
    id: taskId,
  },
);dispatch(
// "action" 객체:
{
type: 'deleted',
id: taskId,
},
);-
useState에서는 set함수를 통해 state를 바꿨다면 useReducer는 dispatch 함수안에는 action이라고 불리는 객체를 전달한다.
-
action의 일반적인 형태는 발생한 일을 설명하는 문자열
type을 넘겨주고 추가 정보를 담아서 전달할수도 있다.
useReducer로 바꾸기 2 - reducer 함수 작성하기
reducer 함수는 실제로 state가 어떻게 바뀔지를 명시하는 곳이다.
현재의 state 값과 action 객체, 이렇게 두 개의 인자를 받고 다음 state 값을 반환한다.
function tasksReducer(tasks, action) {
  switch (action.type) {
    case 'added': {
      return [
        ...tasks,
        {
          id: action.id,
          text: action.text,
          done: false,
        },
      ];
    }
  }
}
function tasksReducer(tasks, action) {
switch (action.type) {
case 'added': {
return [
...tasks,
{
id: action.id,
text: action.text,
done: false,
},
];
}
}
}reducer 함수는 state(tasks)를 인자로 받고 있기 때문에, 이를 컴포넌트 외부에서 선언할 수 있다. 이것이 앞서 말한 useState의 set함수가 복잡해질때 useReducer가 대안이 될수 있는 이유이다.
reducer 함수 안에서는 type을 기준으로 switch 문을 사용하는 게 일반적이다.
이름이 reducer인 이유
배열에서 사용하는
reduce()연산의 이름에서 유래했다. 지금까지의 결과(result)와 현재 아이템(number)을 인자로 받고 다음 결과를 반환한다. 비슷한 아이디어의 예로 React의 reducer는 지금까지의 state와 action을 인자로 받고 다음 state를 반환한다. 이 과정에서 여러 action을 누적하여 state로 반환한다.
useReducer로 바꾸기 3 - 컴포넌트에서 reducer 사용하기
import { useReducer } from 'react';

// 바꾸기 전
const [tasks, setTasks] = useState(initialTasks);

// 바꾼 후
const [tasks, dispatch] = useReducer(tasksReducer, initialTasks);
// const [state, dispatch 함수] = useReducer(reducer함수, 초기값)
// dispatch 함수 (사용자의 action을 reducer 함수에게 “전달하게 될”)

function handleAddTask(text) {
  dispatch({
    type: 'added',
    id: 142,
    text: text,
  });
}
import { useReducer } from 'react';
// 바꾸기 전
const [tasks, setTasks] = useState(initialTasks);
// 바꾼 후
const [tasks, dispatch] = useReducer(tasksReducer, initialTasks);
// const [state, dispatch 함수] = useReducer(reducer함수, 초기값)
// dispatch 함수 (사용자의 action을 reducer 함수에게 “전달하게 될”)
function handleAddTask(text) {
dispatch({
type: 'added',
id: 142,
text: text,
});
}이벤트 핸들러는 action을 전달해줘서 무슨 일이 일어났는지에 관련한 것만 명시하면 되고 reducer 함수는 이에 대한 응답으로 state가 어떤 값으로 업데이트 될지를 결정하기만 하면 된다.
useReducer 특징
- reducer 함수를 미리 작성해야한다. 이 함수가 길어진다면 다른 파일에서 관리할 수 있다.
- reducer는 순수함수로 작성되어 독립적으로 테스트가 가능하다.
- 복잡한 구조에서 state를 다룰때 업데이트 로직하고 이벤트 핸들러의 결과를 명확히 구분할 수 있다.
6. Context를 사용해 데이터를 깊게 전달하기
Props 전달하기의 문제점
어떤 prop을 트리를 통해 깊이 전해줘야 하거나, 많은 컴포넌트에서 같은 prop이 필요한 경우에 장황하고 불편할 수 있다.
가장 가까운 공통 조상은 트리 상 높이 위치할 수 있고 그렇게 높게까지 state를 끌어올리는 것은 “Prop drilling”이라는 상황을 만든다.
Props 전달하기의 대안으로 Context를 써보자
<Section>
  <Heading level={3}>About</Heading>
  <Heading level={3}>Photos</Heading>
  <Heading level={3}>Videos</Heading>
</Section><Section>
<Heading level={3}>About</Heading>
<Heading level={3}>Photos</Heading>
<Heading level={3}>Videos</Heading>
</Section><Section level={3}>
<Heading>About</Heading>
<Heading>Photos</Heading>
<Heading>Videos</Heading>
</Section><Section level={3}>
<Heading>About</Heading>
<Heading>Photos</Heading>
<Heading>Videos</Heading>
</Section>-
각각
Heading컴포넌트에 level을 넘기는게 아니라Section에서 level 값을 가지고 있고Heading컴포넌트는 단지Section에 level을 요청한다. -
이러한 방식으로 context는 값을 provider가 가지고 있고 하위 컴포넌트는 이를 요청하여 전달 받는다.
1단계: Context 생성하기
import { createContext } from 'react';

export const LevelContext = createContext(1); // 기본값 1
import { createContext } from 'react';
export const LevelContext = createContext(1); // 기본값 12단계: Context 사용하기
import { useContext } from 'react';

import { LevelContext } from './LevelContext.js';

export default function Heading({ children }) {
  const level = useContext(LevelContext);
  // ...
}
import { useContext } from 'react';
import { LevelContext } from './LevelContext.js';
export default function Heading({ children }) {
const level = useContext(LevelContext);
// ...
}-
useContext에 생성한 context를 넘겨서 값을 사용할수 있다.
-
하지만 아직 제공하지 않았기에 값은 초기값인 1을 가리킨다.
3단계: Context 제공하기
LevelContext를 자식들에게 제공하기 위해 context provider로 감싸줍니다.
여기서 LevelContext는 LevelContext.Provider와 동일하게 동작한다.
import { LevelContext } from './LevelContext.js';

export default function Section({ level, children }) {
  return (
    <section className="section">
      {/* LevelContext.Provider */}
      <LevelContext value={level}>
        {children}
      </LevelContext>
    </section>
  );
}

export default function Page() {
  return (
    <Section level={1}>
      <Heading>Title</Heading>
      <Section level={2}>
      ...
import { LevelContext } from './LevelContext.js';
export default function Section({ level, children }) {
return (
<section className="section">
{/* LevelContext.Provider */}
<LevelContext value={level}>
{children}
</LevelContext>
</section>
);
}
export default function Page() {
return (
<Section level={1}>
<Heading>Title</Heading>
<Section level={2}>
...Section 내의 어떤 컴포넌트가 LevelContext를 요구하면 level을 준다.
컴포넌트는 그 위에 있는 UI 트리에서 가장 가까운 <LevelContext.Provider>의 값을 사용한다.
export default function Section({ children }) {
  const level = useContext(LevelContext);

  return (
    <section className='section'>
      <LevelContext value={level + 1}>{children}</LevelContext>
    </section>
  );
}
export default function Section({ children }) {
const level = useContext(LevelContext);
return (
<section className='section'>
<LevelContext value={level + 1}>{children}</LevelContext>
</section>
);
}위와 같이 수정하여 각 Section은 위의 Section에서 level을 읽고 자동으로 level + 1을 아래로 전달한다.
맨위에 있는 Section은 기본값 1을 참조한다.
Context를 사용하기 전에 고려할 것
-
Props 전달하기로 시작하기. props로 전달하는게 무조건 나쁜것만은 아니다. 어떤 컴포넌트가 어떤 데이터를 사용하는지 명확하게 알려준다.
-
컴포넌트를 추출하고 JSX를
children으로 전달하기. 데이터를 사용하는 중간 컴포넌트 층이 많다면children을 props로 받고<Layout><Posts posts={posts} /><Layout>와 같이 활용하여 바로 전달하는 방법도 있다.
context로 공유되는 값이 변하면 그 값을 사용하는 모든 컴포넌트와 그 자식 컴포넌트가 모두 리렌더링이 된다. 따라서 테마모드와 같이 많이 변하지 않는 값으로 context를 지정하는게 좋다.
Context로 라우팅 구현 예시
const RouterContext = React.createContext();

function Router({ children }) {
  const [currentPath, setCurrentPath] = useState(window.location.pathname);

  useEffect(() => {
    const onLocationChange = () => {
      setCurrentPath(window.location.pathname);
    };

    window.addEventListener('popstate', onLocationChange);
    return () => window.removeEventListener('popstate', onLocationChange);
  }, []);

  return (
    <RouterContext.Provider value={{ currentPath }}>
      {children}
    </RouterContext.Provider>
  );
}
const RouterContext = React.createContext();
function Router({ children }) {
const [currentPath, setCurrentPath] = useState(window.location.pathname);
useEffect(() => {
const onLocationChange = () => {
setCurrentPath(window.location.pathname);
};
window.addEventListener('popstate', onLocationChange);
return () => window.removeEventListener('popstate', onLocationChange);
}, []);
return (
<RouterContext.Provider value={{ currentPath }}>
{children}
</RouterContext.Provider>
);
}Router컴포넌트는 현재 경로(currentPath)를 Context에 제공한다.- 브라우저의
popstate이벤트를 감지하여 경로가 변경될 때마다currentPath를 업데이트한다.
function Link({ to, children }) {
  const { currentPath } = useContext(RouterContext);
  const isActive = currentPath === to;

  const handleClick = (e) => {
    e.preventDefault();
    window.history.pushState({}, '', to);
    window.dispatchEvent(new PopStateEvent('popstate'));
  };

  return (
    <a
      href={to}
      onClick={handleClick}
      style={{ color: isActive ? 'red' : 'blue' }}
    >
      {children}
    </a>
  );
}
function Link({ to, children }) {
const { currentPath } = useContext(RouterContext);
const isActive = currentPath === to;
const handleClick = (e) => {
e.preventDefault();
window.history.pushState({}, '', to);
window.dispatchEvent(new PopStateEvent('popstate'));
};
return (
<a
href={to}
onClick={handleClick}
style={{ color: isActive ? 'red' : 'blue' }}
>
{children}
</a>
);
}Link컴포넌트는currentPath와 자신의to경로를 비교하여 활성화 상태를 결정한다.- 링크를 클릭하면
window.history.pushState를 사용하여 경로를 변경하고,popstate이벤트를 발생시켜Router가 경로를 업데이트한다.
function Route({ path, component }) {
  const { currentPath } = useContext(RouterContext);

  return currentPath === path ? React.createElement(component) : null;
}
function Route({ path, component }) {
const { currentPath } = useContext(RouterContext);
return currentPath === path ? React.createElement(component) : null;
}7. Reducer와 Context로 앱 확장하기
Reducer와 context를 결합하는 방법
- Context를 생성합니다.
const [tasks, dispatch] = useReducer(tasksReducer, initialTasks);const [tasks, dispatch] = useReducer(tasksReducer, initialTasks);useReducer 는 tasks와 dispatch를 반환하므로 전달해야하는게 두개다.
따라서 두개의 context를 만든다.
import { createContext } from 'react';

export const TasksContext = createContext(null);
export const TasksDispatchContext = createContext(null);
import { createContext } from 'react';
export const TasksContext = createContext(null);
export const TasksDispatchContext = createContext(null);- State와 dispatch 함수를 context에 넣습니다.
import { TasksContext, TasksDispatchContext } from './TasksContext.js';

export default function TaskApp() {
  const [tasks, dispatch] = useReducer(tasksReducer, initialTasks);
  // ...
  return (
    <TasksContext.Provider value={tasks}>
      <TasksDispatchContext.Provider value={dispatch}>
        ...
      </TasksDispatchContext.Provider>
    </TasksContext.Provider>
  );
}
import { TasksContext, TasksDispatchContext } from './TasksContext.js';
export default function TaskApp() {
const [tasks, dispatch] = useReducer(tasksReducer, initialTasks);
// ...
return (
<TasksContext.Provider value={tasks}>
<TasksDispatchContext.Provider value={dispatch}>
...
</TasksDispatchContext.Provider>
</TasksContext.Provider>
);
}- 트리 안에서 context를 사용합니다.
<TasksContext.Provider value={tasks}>
<TasksDispatchContext.Provider value={dispatch}>
<h1>Day off in Kyoto</h1>
<AddTask />
<TaskList />
</TasksDispatchContext.Provider>
</TasksContext.Provider><TasksContext.Provider value={tasks}>
<TasksDispatchContext.Provider value={dispatch}>
<h1>Day off in Kyoto</h1>
<AddTask />
<TaskList />
</TasksDispatchContext.Provider>
</TasksContext.Provider>props를 제거하고 useContext에서 값을 추출해서 사용한다.
export default function AddTask({ onAddTask }) {
const [text, setText] = useState('');
const dispatch = useContext(TasksDispatchContext);
// ...
return (
// ...
<button onClick={() => {
setText('');
dispatch({
type: 'added',
id: nextId++,
text: text,
});
}}>Add</button>
// ...export default function AddTask({ onAddTask }) {
const [text, setText] = useState('');
const dispatch = useContext(TasksDispatchContext);
// ...
return (
// ...
<button onClick={() => {
setText('');
dispatch({
type: 'added',
id: nextId++,
text: text,
});
}}>Add</button>
// ...State는 여전히 최상위 TaskApp 컴포넌트에서 useReducer로 관리되고 있다. 그러나 이제 context를 가져와 트리 아래의 모든 컴포넌트에서 해당 tasks 및 dispatch를 사용할 수 있다.
하나의 파일로 합치기
reducer와 context를 하나의 파일에 작성한다.
아래와 같이 최상단 컴포넌트에서 useReducer를 context 파일로 옮긴다.
import { TasksContext, TasksDispatchContext } from './TasksContext.js';

export default function TaskApp() {
  const [tasks, dispatch] = useReducer(tasksReducer, initialTasks);
  // ...
  return (
    <TasksContext.Provider value={tasks}>
      <TasksDispatchContext.Provider value={dispatch}>
        ...
      </TasksDispatchContext.Provider>
    </TasksContext.Provider>
  );
}import { TasksContext, TasksDispatchContext } from './TasksContext.js';
export default function TaskApp() {
const [tasks, dispatch] = useReducer(tasksReducer, initialTasks);
// ...
return (
<TasksContext.Provider value={tasks}>
<TasksDispatchContext.Provider value={dispatch}>
...
</TasksDispatchContext.Provider>
</TasksContext.Provider>
);
}수정후
import AddTask from './AddTask.js';
import TaskList from './TaskList.js';
import { TasksProvider } from './TasksContext.js';

export default function TaskApp() {
  return (
    <TasksProvider>
      <h1>Day off in Kyoto</h1>
      <AddTask />
      <TaskList />
    </TasksProvider>
  );
}
import AddTask from './AddTask.js';
import TaskList from './TaskList.js';
import { TasksProvider } from './TasksContext.js';
export default function TaskApp() {
return (
<TasksProvider>
<h1>Day off in Kyoto</h1>
<AddTask />
<TaskList />
</TasksProvider>
);
}그리고 모든 코드가 모인 파일내용이다.
import { createContext, useReducer } from 'react';

export const TasksContext = createContext(null);
export const TasksDispatchContext = createContext(null);

// 각 컨텍스트를 별도로 내보내기
export function useTasks() {
  return useContext(TasksContext);
}

export function useTasksDispatch() {
  return useContext(TasksDispatchContext);
}

// 최상단 컴포넌트에 선언되어있던것을 분리하여 여기에 선언
export function TasksProvider({ children }) {
  const [tasks, dispatch] = useReducer(tasksReducer, initialTasks);

  return (
    <TasksContext.Provider value={tasks}>
      <TasksDispatchContext.Provider value={dispatch}>
        {children}
      </TasksDispatchContext.Provider>
    </TasksContext.Provider>
  );
}

// reducer 선언
function tasksReducer(tasks, action) {
  switch (action.type) {
    case 'added': {
      return [
        ...tasks,
        {
          id: action.id,
          text: action.text,
          done: false,
        },
      ];
    }
    case 'changed': {
      return tasks.map((t) => {
        if (t.id === action.task.id) {
          return action.task;
        } else {
          return t;
        }
      });
    }
    case 'deleted': {
      return tasks.filter((t) => t.id !== action.id);
    }
    default: {
      throw Error('Unknown action: ' + action.type);
    }
  }
}

// 초기값
const initialTasks = [
  { id: 0, text: 'Philosopher’s Path', done: true },
  { id: 1, text: 'Visit the temple', done: false },
  { id: 2, text: 'Drink matcha', done: false },
];
import { createContext, useReducer } from 'react';
export const TasksContext = createContext(null);
export const TasksDispatchContext = createContext(null);
// 각 컨텍스트를 별도로 내보내기
export function useTasks() {
return useContext(TasksContext);
}
export function useTasksDispatch() {
return useContext(TasksDispatchContext);
}
// 최상단 컴포넌트에 선언되어있던것을 분리하여 여기에 선언
export function TasksProvider({ children }) {
const [tasks, dispatch] = useReducer(tasksReducer, initialTasks);
return (
<TasksContext.Provider value={tasks}>
<TasksDispatchContext.Provider value={dispatch}>
{children}
</TasksDispatchContext.Provider>
</TasksContext.Provider>
);
}
// reducer 선언
function tasksReducer(tasks, action) {
switch (action.type) {
case 'added': {
return [
...tasks,
{
id: action.id,
text: action.text,
done: false,
},
];
}
case 'changed': {
return tasks.map((t) => {
if (t.id === action.task.id) {
return action.task;
} else {
return t;
}
});
}
case 'deleted': {
return tasks.filter((t) => t.id !== action.id);
}
default: {
throw Error('Unknown action: ' + action.type);
}
}
}
// 초기값
const initialTasks = [
{ id: 0, text: 'Philosopher’s Path', done: true },
{ id: 1, text: 'Visit the temple', done: false },
{ id: 2, text: 'Drink matcha', done: false },
];사용예시
const tasks = useTasks();
const dispatch = useTasksDispatch();
const tasks = useTasks();
const dispatch = useTasksDispatch();